Sunday, August 8, 2010

Egyptian Inspired Self Portraits

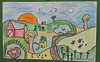
STUDENT EXAMPLES: Click to enlarge
Egyptian Inspired Self Portraits Egyptian Inspired Self PortraitsEgyptian Inspired Self Portraits

OUTCOME:
Students will gain an understanding of Ancient Egyptian portrait paintings and hieroglyphics. Students will successfully draw and paint a self portrait using inspiration from Ancient Egyptian artwork. Students also be able to successfully write their name using hieroglyphics.

OBJECTIVES:

The Learner Will:

  • Describe what hieroglypics are and be able to demonstrate how they are used by writing their name.
  • Identify where Egypt is located on a map.
  • Know the characteristics of Egyptian portraits.
  • Compare and contrast their self portrait with Egyptain portraits.
  • Develop ideas from imagination, their everday lives, and other visual inspiration discussed in class.
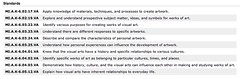
STANDARDS: Click to enlarge
Egyptian Inspired Self Portraits MI State Standards

AUDIENCE: Upper Elementary - 6th grade

TIME ALLOTMENT: Two class periods, 75 minutes each week.

MATERIALS:
  • 11x14" white paper
  • Tempera paints
  • Paintbrushes
  • Pencil
  • Examples of Egyptian portraits
  • Powerpoint (Laptop, projector)

WEEK ONE
  • Anticipatory Set - Write my name on the white board using hieroglyphics, after students sit down greet them and ask the following questions:
    • Does anyone know what word I wrote on the white board?
    • What language do you think this is?
    • Has anyone ever heard of "hieroglyphics" before?
    • What are "hieroglyphics"?
  • Present power point on Egyptian hieroglyphics. (For visual learners.)
    • Ask for a volunteer to point out Egypt on the map.
    • Explain "hieroglyphics" and show examples.
  • Pass out hand-out on hieroglyphics.
  • Select a student and do a demonstration on the white board writing their name in hieroglyphics. Ask students to follow along on their hand-out.
  • Pass out paper and pencils for students to practice writing their names with hieroglyphics.
    • Give students 10-12 minutes to practice writing their name.
    • Walk around room and assist students as needed.
  • Continue with the power point on Egyptian portraits.
  • Show examples of the project: Egyptian self portraits.
  • Discuss traits of Egyptian portraits. (Opportunity for verbal/linguistic learners to participate in discussion and later on in critique, interpersonal learners will be able to learn as a group.)
    • The head and legs are in profile. The body is is front view. Why do you think that is? Why?
    • Explain how Egyptian artists wanted to show the width of the chest.
    • Foreshortening (show examples) - when an object appears compressed when it is seen from a certain viewpoint.
    • Did the artists of the Egyptian portraits use foreshortening? Why or why not?
    • Explain that Egyptian artists didn't know about foreshortening, which is why they went from profile view to front view and returned to profile view.
    • What colors did the artists use in the portraits?
      • Reddish-brown was used for men.
      • Yellowish-buff was used for the women.
      • These colors were used to distinguish the two sexes, not because they were actually those colors.
      • Many of the portraits appeared flat due to their use of color and lack of foreshortening.
  • Demonstrate how to draw a self portrait in Egyptian style.
    • Ask students to imagine that they are Egyptian and are going to paint a self portrait.
    • Demonstrate how to draw a face in profile view.
    • From there demonstrate how to draw a body and arms in front view.
    • Finish by returning to profile view and draw the legs and feet.
    • Go over how the Egyptians adorned their heads with wigs and crowns.
    • Remind students to add Egyptian elements.
      • Clothing
      • Hairstyles
      • Jewelry
      • Footwear, etc.
  • Pass out paper for students to begin drawing their portraits. (Intrapersonal learners will be able to work alone during this time.)
    • Walk around the room and assist students with their drawings as needed.
  • Before students leave remind them that next week they will paint their portraits with tempera paint.

WEEK TWO
  • Anticipatory Set - Have your name written on the white board again as students enter the classroom.
    • Does anyone remember what this is called? (Hieroglyphics)
    • What country do they use hieroglyphics in? (Egypt)
    • Pass out self portraits from Week One.
    • Pass out the hand-out on hieroglyphics from Week One.
  • Allow students to finish drawing their portraits if needed.
  • Pass out tempera paints, brushes, and water to students.
  • Remind students to think about Egyptian elements in their drawings.
    • How can the viewer tell if the person in your portrait is Egyptian or not?
    • What kinds of clothes are they wearing? Jewelry?
    • What's in your background? How can the viewer tell if you are in Egypt.
    • Is your name in hieroglyphics included in your drawing?
  • Before students begin painting remind them:
    • Reddish-brown was used for men, so if you are a boy use reddish-brown.
    • Yellowish-buff was used for women, so if you are a girl use yellowish-buff.
  • Demonstrate briefly on how to mix colors to make reddish-brown and yellowish-buff.
  • Allow students to begin painting, walking around the room and assisting them as needed.
  • When students are finished ask for volunteers to show their paintings to the rest of the class.
    • What makes this portrait Egyptian? How is it similar or different to the portraits we looked at in class?
    • Did you include your name in hieroglyphics?
    • What colors did you use to paint the skin?
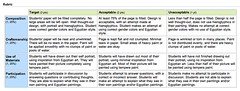
RUBRIC: Click to enlarge
Egyptian Inspired Self Portraits Rubric

Saturday, July 17, 2010

Line Landscapes

Line Landscapes(Click to enlarge)

Outcome
Students will gain a deeper understanding of different types of lines and how lines can make up landscapes. Students will develop an appreciation for the use of lines within their own lives.

Objectives
The Learner Will:
  • Describe what a landscape is.
  • Describe what line is.
  • Give examples of various kinds of lines.
  • Demonstrate how line is used within a landscape.
  • Develop ideas from imagination, everyday lives, and other visual inspiration discussed in class.
  • Compare and contrast their own landscape with real landscapes.
  • Identify and explain how their color choices influence mood or feelings.
  • Identify and explain foreground, middle ground, and background.

Standards
MI.A.K-6.01.23.VA Use visual characteristics and organi zational principles of art to communicate ideas.
MI.A.K-6.02.17.VA Apply knowledge of materials, techniques, and processes to create artwork.
MI.A.K-6.02.19.VA Explore and understand prospective subject matter, ideas, and symbols for works of art.
MI.A.K-6.03.23.VA Understand there are different responses to specific artworks.
MI.A.K-6.03.24.VA Describe and compare the characteristics of personal artwork.
MI.A.K-6.03.25.VA Understand how personal experiences can influence the development of artwork.
MI.A.K-6.05.12.VA Explain how visual arts have inherent relationships to everyday life.

Audience
K-2 grade elementary students

Time Allotment
Two, 55 minute class periods. Time may be added or reduced to meet the needs of the students.

Materials
  • 11 x 14" white paper
  • Pencil
  • Sharpie markers (variety of colors)
  • Paint brushes
  • Cups of water
  • Watercolor Paints
Week One
  1. Anticipatory Set
  • Have the word "line" written on the white board and examples of the project hanging in the front of the room.
  1. Concepts
  • Ask for a few volunteers to share what they think "line" means.
  • Ask students to give examples of line and draw them on the white board under the word "line" as they say them.
  • Ask for a volunteer to share what a "landscape" is.
  • Ask for a volunteer to find a landscape within the room (Starry Night by Vincent Van Gogh). Make sure all of the students agree that it is a landscape.
  • Show students my example of a landscape made up of lines. Ask questions:
    • What kinds of lines did I use in my landscapes? How can you tell what it is that I drew?
  • Explain to students that they are going to use line, like the lines we drew on the board, to create a landscape.

3. Demonstration

  • In the front of the room on a large sheet of white paper begin drawing a landscape using line.
  • Ask students for ideas on what lines to draw and what they could represent.
  • Use different color sharpie markers and ask students what kind of mood it creates and why as you draw.

4. Production

  • Pass out paper to each student.
  • Instruct them to begin drawing their landscapes using pencil.
    • Remind them to use lines to create their landscape.
    • Leave the lines you drew on the board as a reference.
  • After a majority of the class has finished drawing with pencil, allow them to use sharpie markers to go over their lines.
    • Remind them to think about color and the mood or feeling it creates.
    • After 10 minutes or so, ask students to put the sharpie markers away.
  • Allow students to begin filling in areas with crayon, but remind them to keep some areas open for watercolor (show them my example again).

5. Closure

  • Collect papers and remind students they are able to finish next week.
  • Ask for a few volunteers to share with the class how they used line in their landscape.
  • Ask for a few different volunteers to share how they used color to create a mood or feeling in their landscape.

Week Two

1. Anticipatory Set

  • Have examples of landscapes in the front of the room, with the one I began demonstrating on in the center of the white board.

2. Demonstration

  • Ask for a volunteer to to share with the class what we did last week.
  • Ask if anyone remembers the artist who painted "Starry Night." (Vincent Van Gough)
  • Explain to the class that they are going to be using watercolor to fill in the space in their landscape.
    • Ask several students: What do you think watercolor will do to your painting? Why?
  • Review with students on how to use watercolor.
    • Ask class: After I dip my paintbrush in the blue should I dip it in the yellow?
    • What will it do?
    • What should I do?
  • Do a brief demonstration on adding watercolor to your landscape.
    • Should I only use blue in the sky? What other colors could I use?
    • What kind of mood will that create for my landscape? Why?

3. Production

  • Ask for volunteers to pass out the landscapes to students.
  • Allow students to finish using crayon on their landscape if needed.
  • Pass out watercolor and water.
  • Have a student volunteer pass out one paintbrush to each student.
  • Allow students to begin using watercolor on their landscapes.

4. Concepts

  • Stop students after about 10 minutes.
  • Show students my example of the finished product.
    • How did I use watercolor in my painting?
    • What mood or feeling do you get when you look at my painting? Why?
  • Explain foreground, middle ground, and background to students.
    • Foreground is what is closest to you (show on my landscape).
    • Background is the sky and whatever is furthest away (show on my landscape).
    • Middleground is everything that is inbetween (show on my landscape).
    • Allow them to visualize by giving an example of when they are on the playground.
  • Allow students to continue working on their landscapes.

5. Closure

  • Have my finished example hanging in the front of the room.
  • Ask for 3 volunteers to come to the front of the room.
  • Have "Contestant One" find the foreground in the painting. Make sure the class agrees.
  • Have "Contestant Two" find the middleground in the painting. Make sure the class agrees.
  • Have "Contestant Three" find the background in the painting. Make sure the class agrees.
  • Have students put their finished paintings on the dry rack when done.
Rubric: Click to enlarge

Line Landscapes Rubric

Friday, June 11, 2010

Junk Art


At the beginning of the year we had a school wide project that focused on the concept of sustainability. For 6th grade I came up with this junk art lesson. This lesson could easily be adapted for elementary, all middle schools grades or high school by adding or taking away from the lesson. This lesson will take typically ten days (based on 45 minute classes, 5 days a week) but time may be adjusted to meet the needs of the students.

Projects were in the form of relief sculptures – assembled by cutting strips of cardboard and bases and assembling them as a class. See pictures for references. The finished boxes were 5×5 inches with 1 inch walls.

Materials: I collected various materials over the summer and I also had students bring in materials to share and use for the project over the course of a few days.

  • Cardboard
  • Xacto knife or sharp scissors
  • Cutting mats
  • Glue (hot glue, elmer’s, stick glue)
  • Pencils, markers, crayons
  • Paper/Magazines/Newspapers
  • Bottles/Cans/Tins
  • Fabric
  • Paint (acrylic or tempera)
  • Lids or caps, small containers
  • Stickers, beads, etc.
  • Any other ‘found’ or ‘junk’ material

Definition of Sustainability (in the context of 3D Art):

The ability of a material to be used and reused continuously in the form of art over a significant period of time of which is produced for the wider impact of the world and its reception in relation to its environment.

Day One Introduction:

Objective: Students will explore the concept of ‘one man’s trash is another man’s treasure’ by choosing recyclable objects to be a treasure and a trash.

Essential Questions: Is one man’s trash another man’s treasure? In what ways can we reuse objects we’d normally throw away to create something else?

Enduring Understanding: I am teaching the concept of one man’s trash is another man’s treasure so that kids come to understand that recycled objects can be used to create art.

** Have random “junk” objects on each table when the students walk into the classroom.**

  • “One man’s trash is another man’s treasure” (Identity)
    • To introduce myself to the students I will choose one object that I consider a “treasure” and another that I consider “trash.” Explain to class why I chose these particular objects.
    • Instruct students to look through the objects on each table and to choose for themselves one treasure and one trash. Students will write a written reflection on why they chose each object. Have them include the following:
      • How choosing these particular objects relates to them as a person and who they are.
      • Taking a second look at each object what could you possibly do with them besides throw them away or recycle them?
      • While they are choosing their objects share the following quote and have them write down what they think it means.
        • “Eliminate the concept of waste — not reduce, minimize, or avoid waste…. but eliminate the very concept: by design.” – William McDonough & Michael Braungart (quote will also be posted in the classroom)
    • After students are finished writing their reflections have a class discussion about the activity.
      • Ask for volunteers to share their reflections with the class.
  • Have a discussion with the class about what kinds of recyclable objects they save and reuse for something else.
  • Talk briefly about the importance of recycling and how many everyday items contain recycled materials. Ask if anyone has an example, show personal example: chap stick tube
  • Homework: Instruct students to bring in as many recyclable objects as they can over the next two days. Give them examples: milk cartons, plastic, cans, cardboard boxes, paper towel rolls, etc.

Day Two:

Objective: Students will explore various contemporary arts, including “junk art.” Students will compare and contrast various works of art and learn some of the basic art language. Students will discuss sustainability in relation to art and other subjects.

Essential Questions: Is “junk art” a sustainable form of art? Why or why not?

Enduring Understanding: I am teaching critical thinking in art so that kids come to understand that they can choose for themselves whether they believe something to be art or not.

  • Introduce various works of art (including junk art, Heidelberg project* etc.)
    • What do you see?
    • Is this art? Why or why not?
    • What makes something art?
    • What is sustainability? Is this a form of sustainable art? What makes something sustainable?
  • Introduce sustainability project (handout/checklist)
  • Remind students that they will need to bring in recyclable objects to use for their project tomorrow

Resources: The Heidelberg Project Videos

Day Three:

Objective: Students will plan, design and develop a concept and physically execute it in the form of 3D art.

Essential Questions: How does an artist come up with an idea? Where does an artist get inspiration from? How does an artist go from idea to the actual piece of art?

Enduring Understanding: I am teaching how artists come up with ideas so that kids come to understand the process of concept (paper) to production (physical artwork).

Anticipatory Set: Have assignment written on the blackboard: In your sketchbook write down three ways you use to come up with new ideas. Now write down three things that inspire you. (5-7 minutes)

  • After students are finished ask for some volunteers to share how they come up with new ideas.
  • Prompt the students with questions:
    • How do you think artists come up with new ideas?
    • What kinds of things do you think usually inspire artists?
    • How does this relate to what you wrote down in your sketchbook?
    • After an artist comes up with an idea what do you think they do next?
  • Review project hand out with students and remind them that they will be using the functional objects they brought in and changing their function in some way to create something new.
  • Thinking Process: How artists organize their concepts (hand out check list)
    • Generate a concept by brainstorming or researching (students may do this however it works best for them: bullet list, sketching, idea web, etc.)
    • 3-5 thumbnails
      • You have an idea so how are you going to execute it?
      • Look at the concept from all possible angles, which fits best?
      • Which ones work? Which ones don’t? (Working out the details)
    • Evaluate your materials – what do you have that will work? What do you need?
    • Revising and polishing – come up with a final, more detailed sketch of what you want to do and how you will do it. Be sure to include your materials and where they will go.
    • From concept (paper) to production (creating actual artwork)
      • Is there something you thought would work but it didn’t?
      • It’s okay to change or rearrange – it’s all a part of the thinking process of an artist
    • Evaluating finished product – do you need to rework it? How has it changed from your original design and/or concept?
  • Give students time to go through the thinking process (check sheet) and work out their ideas. Circulate room and assist students as needed.
  • Closure: Remind students to bring in any extra objects they may want to use for their project and make a list of materials needed in their sketchbooks.

Day Four:

Objective: Students will finish the planning process and begin creating their project.

Essential Questions: How is creating art out of junk sustainable? Is this process always desirable? When is it/isn’t it?

Enduring Understanding: I am teaching how to create “junk art” so that kids come to understand there are many different uses for materials we’d normally throw away.

  • Work Day

Day Five:

Objective: Students will create artwork out of recyclable materials and/or junk. Students will also learn the process of artist critiques and go through one with those at their table.

Essential Questions: How can you use critiques as a form of feedback in other subjects besides art?

Enduring Understanding: I am teaching artist critiques so that kids come to understand that artists use them as a form of feedback and a tool for growth and improvement.

  • Work Day
  • Critique (unfinished)
    • Explain that artists use critiques as a form of feedback from other artists.
    • Have each table work as a group; students will take turns telling the other students in their group about their project. Have students share:
      • One thing that is going really well.
      • One thing they would like their classmates to give them a suggestion with.
  • Independent Work
    • After the midpoint critique allow students to being working on their projects
    • Circulate and assist students as needed
  • Closure: Raise your hand if you felt like the critique was helpful. Ask for a few volunteers to share why critiques are important for artists to participate in.

Day Six:

Objective: Students will create artwork out of recyclable materials and/or junk.

Essential Questions: How can creating junk art be beneficial to our environment and world?

Enduring Understanding: I am teaching how to create “junk art” so that kids come to understand that it is a sustainable form of art produced with the consideration of the world and our relationship to our environment.

  • Work Day

Day Seven:

Objective: Students will create artwork out of recyclable materials and/or junk.

Essential Questions: How can creating junk art be beneficial to our environment and world?

Enduring Understanding: I am teaching how to create “junk art” so that kids come to understand that it is a sustainable form of art produced with the consideration of the world and our relationship to our environment.

  • Work Day

Day Eight:

Objective: Students will finish their projects and reflect by filling out a self grade sheet and completing a written reflection.

Essential Questions: How can creating junk art be beneficial to us as individuals and as a part of the community? Is this always a desirable goal?

Enduring Understanding: I am teaching that junk art is sustainable so that kids come to understand that as a goal it is an idea of a world where people care for and nurture the environment and each other.

  • Final Work Day – Students may use this day to finish up their projects in class, along with self-grading sheet and written reflection.
    • Anything not finished in class will be homework.
  • Written Reflection

Day Nine & Day Ten

  • Finish up with a critique and assessment on the project and the concept of sustainability.

Multicultural Masks

Outcome

Students will successfully come up with their own idea for a multicultural mask based on the inspiration from ONE of the following continents/countries: Africa, Egypt, North America, Japan, or India. They will create a mask and use various materials to execute their idea. Students will learn the various purposes of masks throughout the world while gaining an appreciation for masks around the world.

Objectives

The Learner Will:

  • Identify their chosen country on the map of the world.
  • Describe characteristics of masks in their chosen country.
  • Formulate ideas for their mask based on inspiration of their chosen country.
  • Compare and contrast their mask with masks of their chosen country.
  • Evaluate the success of their own mask.

Standards

MI.A.K-6.02.17.VA* Apply knowledge of materials, techniques, and processes to create artwork.
MI.A.K-6.03.23.VA* Understand there are different responses to specific artworks.
MI.A.K-6.03.24.VA* Describe and compare the characteristics of personal artwork.
MI.A.K-6.03.25.VA* Understand how personal experiences can influence the development of artwork.
MI.A.K-6.04.01.VA* Know that the visual arts have a history and specific relationships to various cultures.
MI.A.K-6.04.03.VA* Demonstrate how history, culture, and the visual arts can influence each other in making and studying works of art.
MI.A.K-6.05.12.VA* Explain how visual arts have inherent relationships to everyday life.

Audience

K-5 Grade

Time Allotment

Two class periods, 60 minutes each week.

Resources

Multicultural Masks http://42explore.com/mask.htm
Information on purpose of masks and links to multicultural mask pictures & info.
Power point
Power point showing different examples of multicultural masks.

Materials

1. Art Supplies

  • Cardstock
  • Construction paper
  • Beads, feathers, hemp or string
  • Scissors
  • Glue
  • Markers
  • Crayons
  • Tempera paints
  • Paint brushes
  • Paint pallets
  • Cups for water

2. Technology/Other

  • Examples of masks
  • Power point
  • Projector
  • Computer/lap top

Week One

1. Anticipatory Set

  • Have examples of masks in the front of the room. Ask, “Does anybody know what these and what might they be used for?”

2. Power point

  • Tell students for the end of the “Exploring the World” unit they are going to choose a country that we’ve studied and design a mask based on that country.
  • Show map of the world and have volunteers point out: Japan, North America, Africa, Egypt (within Africa), India, and Australia.
  • Show masks of the various countries. (Verbal/Linguistic learners will be able to participate in discussion here, intrapersonal learners will be able to participate in group learning, and visual/spatial learners will see examples of artwork, a power point, and then be able to create their own mask.)
    • Japan
      • What are some characteristics of the mask?
      • What colors are used? Why?
      • What facial expressions? Why?
      • What designs or symbols are on the mask? Why?
    • Egypt
      • What materials are used in these masks?
      • What facial expressions do they have? Why?
      • What kinds of designs and symbols do they use? Why?
      • What colors are used? Why?
    • Africa
      • What materials are used?
      • What colors are used? Why?
      • What kind of facial expressions do the masks have? Why?
      • What designs are used? Why?
    • India
      • What materials are used in these masks?
      • What facial expressions do they have? Why?
      • What kinds of designs and symbols do they use? Why?
      • What colors are used? Why?
    • Australia
      • What are some characteristics of the mask?
      • What colors are used? Why?
      • What facial expressions? Why?
      • What designs or symbols are on the mask? Why?
    • North America
      • What materials are used in these masks?
      • What facial expressions do they have? Why?
      • What kinds of designs and symbols do they use? Why?
      • What colors are used? Why?
  • Explain the purpose of masks.
    • A mask is anything used to hide, protect, or cover part or all of the face. Masks are worn as a part of a costume or a disguise.
    • Can be an animal or another person.
    • Religious or ritual based.
    • Dramatic portraits of spirit beings, departed ancestors, and invisible powers of social control.
  • Show own example of mask.
    • What country did I choose to base my mask on? How can you tell?

3. Semi-Guided Demonstration & Production

  • Allow students time to think of a country they’d like to use for inspiration.
  • Give them time to sketch ideas.
  • Have a table with supplies ready for them to use, explain which supplies are available. (see materials list.)
  • Show students the basics of cutting out a face shape, making eye and mouth holes.
  • Give students time to begin making masks. (Bodily/kinesthetic learners will be able to move as they create their mask, interpersonal learners will be able to work alone as they make their masks, and logical/mathematical students will be able to explore patterns in making their masks.)
  • Assist students as needed, making time for questions on how to do things.

4. Closure

  • Review the purpose of masks.
  • Remind students to think about the masks from the various countries.
    • How can you make the viewer know where your mask is from?

Week Two

1. Anticipatory Set

  • Have examples of masks in the front of the room. Ask students if they remembered what they did the previous week. Ask students to raise hand if they remember the country they chose as inspiration for their mask.

2. Production

  • Remind students they are working on their masks and review examples of masks in the front of the room.
    • Holding up my example of the mask, ask students: Who remembers what country I chose to base my mask on? How can you tell?
  • Tell students after they complete their mask they will need to write a paragraph describing their mask and how they used their chosen country as inspiration.
  • Allow students to begin working, have supplies ready (see materials list) and volunteers to pass out masks.
  • Assist students as needed.
  • As students begin finishing, help them punch holes and tie elastic to fit the mask to their face.
  • Give students 10 minutes to write paragraph. Have them include:
    • Country chosen, why?
    • What characteristics from that country have you included?
    • What is similar? What is different?
    • One thing they remember from the unit.

3. Critique & Closure

  • Allow students to try on and wear masks.
  • Arrange desks in a circle.
  • Pick a few volunteers to read their paragraph.
  • Allow students time to ask each other questions about their masks.
  • Ask questions:
    • What did you learn from this unit? Favorite thing? Least favorite? Why?
    • What was your favorite country? Why?
    • Give one reason of why someone might wear a mask.

Target (3 pts)Acceptable (2 pts)Unacceptable (1 pt)
Craftsmanship(1, 33%)Mask is stable and well put together, no noticeable glue marks and/or tape marks. Paint and other materials are applied correctly and evenly. Mask is very neat.Mask is fairly stable and put together. A few noticeable glue marks and/or tape marks. Paint is somewhat blotchy, materials applied somewhat even. Mask is somewhat neat.Mask is falling apart, not well put together. Many noticeable glue and/or tape marks. Paint and other materials not distributed evenly, mask looks messy.
Participation(1, 33%)Students will participate in discussion by answering questions or contributing thoughts. They are able to explain what they see in their own mask and masks of the country they selected.Students attempt to answer questions, with a correct or incorrect answer.Students make no attempt to participate in discussion.
Use of Materials(1, 33%)Students will clearly come up with an idea for a mask from a country learned about in class. Materials used will clearly demonstrate the country shown. The entire mask will be covered.Student’s idea for their mask is semi-clear and based somewhat off a country studied in class. At least 75% of the mask will be covered and demonstrate the country shown.Student’s idea for their mask doesn’t pertain to any of the countries studied in class. Less than half of the mask is covered. Poor use of materials.